Tuesday 21 June 2016

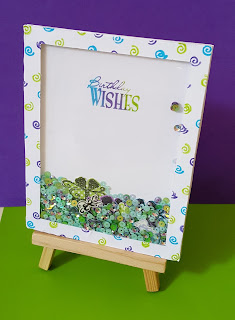
Birthday Wishes - Gift shaker card.

Hello everyone
How are you all? i hope you all are doing fabulous. Today I am posting a shaker card which is filled with sequins and handmade shaker elements. It carries a colorful birthday sentiment with it, which is stamped using 3 colors applied on the same stamp.I am sending this card to the this month challenge at A Blog Named Hero,Creativity with stampsPeek-a-boo designs and Craft Stamper.
  • Peek-a-boo Designs - Anything Goes ( I have used an old stamp sets and vellum and sequins are new stash.
  • A Blog Named Hero - Vellum is used as card base.
  • Creativity with stamps - Manly Card (This card is made using masculine colors like blues and purples)
  • Craft Stamper - Lets Get Inky ( I have used sketchpens and Dye inks
I have used a clear vellum for the base of this card which is in standard A2 size of  4 . 25"x 5 .5 card base. I then went ahead and cut another card base of same size from white heavyweight cardstock. I then cut the white cardbase into 2 parts. Resized one part of the cardstock by 1/8" on all sides and adhered it inside the vellum cardbase,
Now for the card front, I made shaker gift elements using some paper tapes, scraps of cardstock and stamps from GIFTS - HOTP Small Stamp Set. I glued purple, blue and lime green polka dotted paper tapes on scrap cardstock pieces. Then I stamped them using 2 gift stamps using Memento tuxedo Black ink and then fussy cut them. I made 6 gifts of 2 different sizes in 3 colors. Then, I also stamped and fussy cut some bow stamps from the same set.
I cut the white cardstock frame which is 1/4" thick on all sides to make the shaker window. I glued it to acetate sheet which is 41/8"x 5 3/8" in size. Then I added foam adhesive on the edges of the frame carefully not to show any from the sides. I brushed the window with nti static powder before adding shaker elements to avoid them sticking inside.


For the back, I used the other part of the white cardstock I cut earlier and stamped it with Birthday Wishes sentiment from Birthday wishes stamp set from Inkadinkado using Electric Lime dye ink from Ranger, Bahama Blue and Grape Jelly dye ink from Memento. I then filled up the window with green, blue and purple sequins, gifts and bows I made and then attached it to the vellum cardfront. I drew a few swirls using waterproof sketchpens to add some color to the frame of shaker window.

I added 3 gifts to the inside of the card to complete it. That's it and our cute shaker card is ready. I hope you all liked it. Thank you for visiting me.

Saturday 11 June 2016

Galaxy card - Happy Father's Day

Hello everyone
I am back with another Father's Day card. Its June and Father's Day is just around the corner. Its time to celebrate our father and father figures in our lives....and so I made this one for my Father-in-law from my husband and myself.
I am sending this card to the this month challenge at A Blog Named Hero, Creativity with stamps, Peek-a-boo designs, Craft Stamper and Paru's Card Making challenges.
  • Craft Stamper - Lets Get Inky ( I have used watercolors, Dye inks and Fine-tip Pens) 
  • Peek-a-boo Designs - Anything Goes ( I have used an old woodblock stamp and pale grey cardstock used for card base while the watercolors and vellum is new stash) 
  • A Blog Named Hero - Vellum ( I have stamped the sentiment on star pattern clear vellum) 
  • Paru's Card Making Challenge - Father's Day ( The card is made to celebrate Father's Day) 
  • Creativity with stamps - Manly Card ( The card I made is to celebrates all Father figures)
I made made a watercolor card which is inspired from the sentiment " You mean the World to me".
I used rainbow watercolors and applied it randomly on my watercolor cardstock. Once dried, I applied black watercolor to the cardstock while keep it saturated at few places while a bit watery at other places. I removed excess color using a tissue paper. Once it dried, I used white watercolor to add splatters on the card which would resemble the stars. I have used camel watercolor tubes and watercolor cakes.
I mounted it on a pale grey cards which is 4 .25" by 5 .5". Now I added a star pattern vellum on this card  and stamped Happy Father's Day on it using Memento Tuxedo Black dye ink. The stamp Is woodblock mounted local stamp which I had bought years ago.

However, the stamp didn't quite stamp properly and so I had to redo it using waterproof blank pen. I have handwritten the sentiment "You mean the world to us"on the inside an added a few stars that fussy cut from the vellum.
I am uploading a video to show how I made this card.
I hope you like my card and thank you for visiting me.

Stone Pen-stands

Hello everyone
How are you all doing? Its weekend already and it has finally started to rain in Mumbai give all us Mumbaikars the much needed relief from the scorching sun. To celebrate this eventful day, I am blogging today about a pen stand I made for my bff for her office desk. It matches her office decor and color and also it has such fresh ad cool colors that you almost forget about the summer.....
Materials:
  1. Stones or pebbles (colored or uncolored)
  2. Acrylic paints
  3. Epoxy based glue ( Araldite or Epoxy 6000)
  4. Round/ square Chipboard piece (12 cm diameter/sides)
  5. Pattern paper or any paper
  6. Asian Paint Exterior varnish
Procedure:
  1. Clean and wash all your stones with soap water to remove all the dirt and grime. Dry them completely before you start using them.
  2. Get a circular piece of chipboard or any other shape you desire. I have taken approximately 5" in diameter for the base.
  3. Cover it with Pattern paper on both sides. You can use fabric too. Leave it as it is if you want and you can pain it later.
  4. Now start sticking stones in circular manner using epoxy glue ( I used  Araldite). Instructions to use epoxy glue is mentioned on the product itself. Make sure you place stones keeping distance from the center and towards the edge.
  5. Once you place a single layer of stones, wait for it to dry a little. Once it dries up, start building a second layer using epoxy glue. In such manner you can build ans many layers as you want. 
  6. Please be careful while placing the stones as they are irregular shaped, it takes patience and practice to place them properly. Sometimes you might have to hold it in place for few mins to secure them in place. I placed 8 to 10 layers of stones to obtain my pen stands.
  7. The perforated look comes naturally as the stones are all irregular in shape. Dunt worry about any spillage from the epoxy glue. once you varnish your project, it wont be visible.
  8. Now allow the pen-stand to dry for a day. Once dried, I applied acrylic paint to it because
    I wanted partiular color combination. you can leave it as it is also. 
  9. After your color dries up, apply atleast 2 coats of varnish. I have used Asian Paint exterior varnish. You can add embellishments it you want before or after varnishing depending upon what you are using. 
  10. You can start after the cuing time for the varnish is done.
I hope you liked my blog post and thanks for vising me. Keep crafting .....

Tuesday 7 June 2016

Weaved basket with a Lid

Hello everyone

I am back today with another project that I did for a client. I am blogging about this because its different from what I usually make...as in It has a lid on it and I usually make open baskets. Anyways its one of my favorites and so I am sharing this with you.
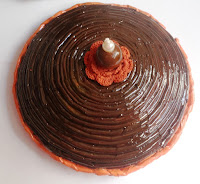
This basket is a weaving style basket and its weaved in the Mat style. I have used 13 newspaper tubes on the base for this basket. To make a sturdy basket. we need sturdy tubes...so I made some tightly wound tubes using the entire half of the newspaper sheet. So, I got uniformly sized tubes which were sturdy and I used a yarn weaving needle.....worked for me. And for the weaving part. I used normal newspaper tubes ( Divide your single side of paper in 3 parts lengthwise). For tutorial about how to weave the basket, visit my earlier post about newspaper weaving basket (Mat Style).

For the lid, I did something different. I coiled the newspaper tubes to 10" diameter as tightly as I could without applying any adhesive in between the coils. I only glued when I reached at the end of my coil. Then again the size of the coil depends on the diameter of your basket. Then what you do is slowly push the layers away. So you will get something like concave bowl. Please be gentle or it might just pop off and you can fix it back. You will have to recoil it. So go slow and as gentle as you can push the coils and shape it into a lid.
Once you are done with this. give it a nice coat of glue mixture (2 parts glue and 1 part water). Now, I have used 3 tubes of newspaper and made a plait out of it. I made 2 such plaits and I glued this plait to the edge of the lid as well as the opening of the basket. Glue it with strong white glue and once it dries, give the entire basket a good glue mixture wash.
 Once the basket dries for 6 hours, we can start painting it. I have used acrylic colors to paint it. Did parts of brows and parts of oranges. Let it dry for 1 hours and you can varnish your project. I have used Asian Paints Aquadur varnish. I did 2 coats in intervals of 2 hours. Let it dry for 1 whole day.
Last step is adding a notch to open the lid. I added a orange crochet flower on top and used a satin ribbon to hold a bead and pearl on top of the flower and knotted the ribbon on the inside.I had a tiny hole purposefully left for this when I was coiling the lid. The bead, pearls and the satin ribbon used are from Itsybitsy while the crochet flower is knitted by my mother-in-law....xoxo..

I hope you all liked my blog post and try to make a basket one for yourself. Its fun and very useful. Till next time...Keep crafting.

Sunday 5 June 2016

Happy Father's Day

Hey Guys

Happy June to all of you. Here today I will be posting a Father's Day Card I created for the new challenge at Craft Stamper, Paru's Card Making ChallengesCreativity with stampsPeek- A Boodesigns and A Blog Named Hero.
Craft Stamper - Lets Get Inky ( I have used watercolors, Dye inks and Fine-tip Pens)
Peek-a-boo Designs - Anything Goes ( I have used an old woodblock stamp and blue cardstock used                                      for card base while the watercolors and vellum is new stash)
A Blog Named Hero - Vellum ( I have stamped the sentiment on pale yellow vellum)
Paru's Card Making Challenge - Father's Day ( The card is made to celebrate Father's Day)
Creativity with stamps - Manly Card ( The card I made is to celebrates all Father figures)
Its June and its the time to celebrate all the Dad's and Grand dad's  and Uncles. We all will be celebrating Father's Day on June 19th and I just can't wait to give the card I made to my father. I am planning to do one more for my father-in-law which I will upload shortly.
For my card, I have used Sky Blue Cardstock for the base which is 5 . 5" x 4 , 25" in size and I glued off white cardstock on it which is 0 . 25" small on sides then the card base. I went ahead and drew the image of a Dad octopus and a daughter octopus on a watercolor cardstock. Then I water colored the 2 images using Camelin watercolors. I did layers of watercolors on the images and outlined it with waterproof black finetip pen and fussy cut the images. I also drew and colored a small mustache for the Dad octopus and fussy cut it too.
I added the 2 pieces on the card using foam adhesive. I added 2 layers of foam tape to the daughter octopus to make it look as if she was sitting on her Dad's lap. I added mustache to the octopus using foam tape too.
The sentiment I added is Happy Father's Day is a very old woodblock stamp which I had bought from a local store and I dun't know the brand. I stamped in on pale yellow vellum with Memento Tuxedo Black dye ink,which I mounted on layers of cardstock and onto the cardbase. I used a red fine-tip waterproof pen to draw some hearts on the card and a Black waterproof fine-tip pen to add stitched marks around the card. I did not add any sequins or glitter as I wanted the card to be manly and simple.
To finish the card, I stamped you'r the best sentiment of the inside of the card which is from Petals from scratch stamp set from Fiskars.

I hope you all liked the card. Thank you for reading my blog post and dun't forget to wish your Father and Grandpa ad Uncle on June 19th.

Thursday 2 June 2016

Baby Shower Ideas- 2

Hello guys
I am back with favors for a Baby shower event. I did this event few months ago and though its time to blog about it. This was a Baby shower event for a very special person and it was also a surprise for the Mommy-to-be. Si I had to hurry up to do this event in a very small amount of time and I forgot blogging about it.
I of course started with planning according to the theme......Blue and Pink...So I started with decoration basics.... handcut some pink and blue crepe paper to make the crepe rolls. Then was balloons....baby showers themed and some plain ones. Then I hand did some banners which were baby themed which completed the decoration part.
These banners were hung with balloons from walls and corners with he crepe paper rolls.
 I even did some tassels to decorate the table on which food and drinks were to be kept.
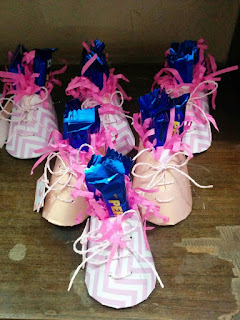
Then it was time for favors....My client wanted 3 favors and so we sat down and worked out what we wanted to give and we decided to do baby booties, Green tea box favor and a small basket filled with girly accessories.
So after a tiring day filled with shopping for accessories and choclates, I sat down to work with the baby booties and tea box

The baby booties are handmade. I used chevron pattern paper with some paper twine. The booties are stuffed with all sorts of chocolates.

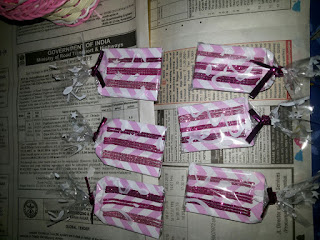
The tea box is made using light blue cand light pink  250 gsm cardstock. It was stamped with Thank you sentiment with the flourish.. I contains 4 green tea bags. The tea bags are designed and printed along with pull out tags for the tea bags.
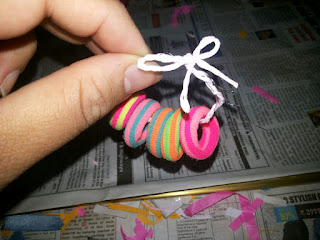
The little baskets were stuffed with shredded paper and thermocol balls. Then, I filled it up with gift wrapped nail enamels, hairbands and hair clips. Then I wrapped the basket with transparent paper and added some satin ribbon bows.


So that finishes the favors. I also added tags to all the favors. These tags are hand drawn and made by hand.
Last but not least, a sache and tiara were made to complete the entire order.

I do have all the pictures for the event and the products I made. Thank for reading my blog and have a great day