Hello everyone.
Today I am posting a tutorial to make tissue paper lanterns. You can use these eco-friendly lanterns to decorate your homes. These lantern are made using tissue papers ( paper napkins) and later colored using kite papers (colored tissue paper). This is a messy process so get ready to get your hands dirty.....
Materials:

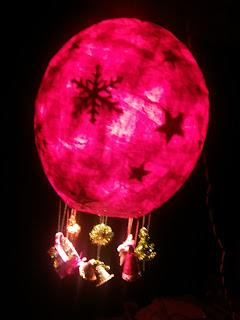
I made the red lantern for Christmas, so I handmade a few ornaments and added them to the lantern.
I hope you guys liked this post and will try to make one for yourselves at home.
See you soon
P.S :This is a messy process and hence I didnt take many photos while making this lantern. But if you have difficulty in understanding any part, please contact me and I will be happy to help you
Today I am posting a tutorial to make tissue paper lanterns. You can use these eco-friendly lanterns to decorate your homes. These lantern are made using tissue papers ( paper napkins) and later colored using kite papers (colored tissue paper). This is a messy process so get ready to get your hands dirty.....


Materials:
- Tissue papers or paper napkins
- Kite papers or colored tissue paper
- White adhesive ( fevicol)
- Balloon
- Water
- Mug or tumbler
- Leaves (large sized leaves from any tree)
- Varnish(optional)
- To start the lantern making process, blow a large sized balloon ( size again is personal choice). Draw a small circle near the balloon end and place it on a tumbler.

- Mix in a bowl fevicol and water in the ratio of 1 : 2. Cut white tissue papers in small square pieces.
- Now start layering the balloon with tissue paper dipped in the fevicol mixture. Continue doing so until u do not apply 4-5 layers of tissue paper.
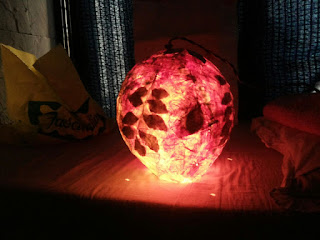
- Now add the leaves on the balloon. You can cut them in any shape you want like stars, hearts, circles etc of your choice and add them on the balloon. I have added leaves as it is in few lanterns as well as stars in another lantern.

- Now continue adding layers of tissue paper on the balloon. Continue this layering process until leaves are no longer visible.
- Once you complete the layering process, let the lantern semi dry for 1-2 hours so we can start the coloring process. We color our lantern using colored kite papers. Use kite papers in the color of your choice and dip them in the fevicol mixture for few seconds. Now squeeze this paper over the balloons to color them. Be sure to add less water and more color by taking out the excess water in the bowl before squeezing on the balloon.

- Have fun with colors and use as many as you want. Do not forget to color the lantern thoroughly on all sides. Now leave the lantern for drying overnight.
- Our lantern will be completely dried by next day. Once you feel so, apply a coat of fevicol generously on the lantern. If you want, you can even use Mod Podge. Leave it to dry again. This time it should dry in 10 mins.
- You will notice that the lantern is now hard and cannot be squashed. Burst the balloon carefully and take it out. Once the balloon is out, trim the opening and make a hole at the top to add wire for electrical connection.
- If you want you can add a coat of varnish if you are planning to use the lantern outside.
- Punch holes for extra effects and your lantern is ready,


I hope you guys liked this post and will try to make one for yourselves at home.
See you soon
P.S :This is a messy process and hence I didnt take many photos while making this lantern. But if you have difficulty in understanding any part, please contact me and I will be happy to help you
Superb di its very helpful to begginers like me
ReplyDeleteI am so glad you found this helpful.
DeleteCheers