Hello everyone
How are you all? I hope you all are having a great day Today's post is about Mini Albums. Mini Albums are smaller versions of albums which may or may not accommodate as many pictures as a normal album would. These albums can also be made like a card or a scrapbook which can hold small messages and pictures. They are not as bulky and give an opportunity to make our greetings pictorial.
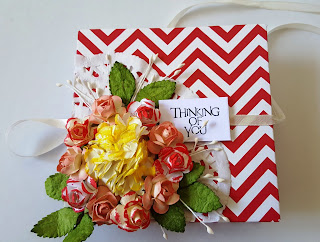

My version of mini album has space for 4 pictures but lot of space for messages and descriptions about the pictures. You can embellish it as you like and use it either like a card or a small scrapbook.
Lets begin.......
Materials:
You can embellish it inside also. Add diecuts or do some stamping. My client wanted it to be plain and simple on the inside and I didn't do much, but you guys can have fun with embellishments and the options are endless. Thank you for reading my blog and have a great day.
How are you all? I hope you all are having a great day Today's post is about Mini Albums. Mini Albums are smaller versions of albums which may or may not accommodate as many pictures as a normal album would. These albums can also be made like a card or a scrapbook which can hold small messages and pictures. They are not as bulky and give an opportunity to make our greetings pictorial.


My version of mini album has space for 4 pictures but lot of space for messages and descriptions about the pictures. You can embellish it as you like and use it either like a card or a small scrapbook.
Lets begin.......
Materials:
- Cardstock( CS)
- Mountboard/ Cardboard
- Adhesive( Fevicol, Red/ White tacky tape)
- Score board( Martha Stewart)
- Pattern Paper
- Scissor
- Embellishments
Procedure:
- We need 3 square 8.5" white cardstock sheets. You can take different size and color if you like. Your album will be 0.25" bigger than half the size of your cardstock. So My album was 4.25" + 0.25" = 4.5" in size.
- Now take the cardstocks and score them in half both horizontally and vertically. Now score them diagonally on only one side. So the CS is now scored horizontally. vertically and diagonally on one side.

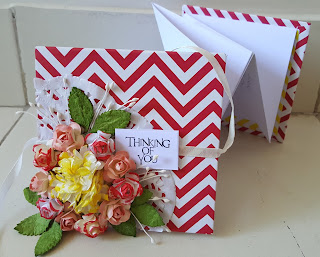
- Please watch the video for better understanding. Fold the card where it is scored such that the entire sheet is folded into a quarter . Do the same for all three sheets.

- Now place the sheets in such a way that the quarter piece of all sheets overlap each other. the first and last sheet must fold towards you and the middle sheet should fold away from you.This is very important.

- Stick the quarters together with good adhesive and fold them all together.
- We need 2 pieces of mountboard 4.5" in size. Cover the mountboard with pattern paper on one side making sure at least 1" of paper is excess on all sides and it folds over to other side. Use good adhesive to adhere the paper. Adhere this to the cardstock pile on both the sides.This makes the cover for our mini album.

- I added little pattern paper strips to make a frame like structure inside the album. Repeated it on the 4 squares inside to obtain frame outline. You can now mount pictures here.

- On the outside, I added a ribbon to facilitate opening/closing of the album. and embellished the cover with mulberry roses and peonies, pollens, Mulberry leaves and a piece of doily. I added a stamped sentiment to complete the look.


I recommend you all to watch the video for better understanding about making this album.
No comments:
Post a Comment