Hey guys
I have made few money envelopes which can be used for specific occasions like baby showers, baby announcements, birthdays etc.
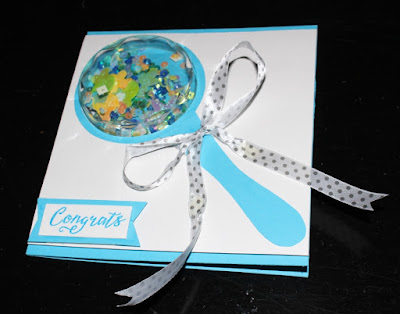
The one I am showing you today is a Shaker card with a money envelope placed securely inside a card. So you can put your cash gifts or gift cards securely inside the envelope in the card as well as write a message inside the card. Sounds cool right!
Materials:
Lets begin....
I have made few money envelopes which can be used for specific occasions like baby showers, baby announcements, birthdays etc.
The one I am showing you today is a Shaker card with a money envelope placed securely inside a card. So you can put your cash gifts or gift cards securely inside the envelope in the card as well as write a message inside the card. Sounds cool right!

Materials:
- Satin ribbon ( plain , striped , dotted )
- Cardstock white for top
- Cardstock for card ( any color)
- Scissor
- Glue ( fevicol and fevibond)
- Compass to draw circle
- Stamps and dye inks with acrylic blocks
- Sequins
- Mounting tape or foam tape or craft foam
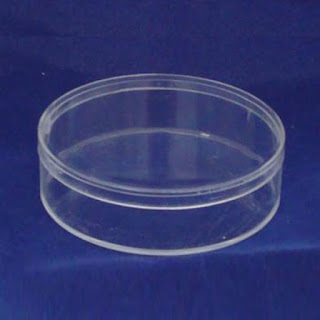
- clear acetate sheet or plastic round box
- Crafting mat
- Pencil
- Crafting knife
Lets begin....
- Take white cardstock (120 gsm ) and cut in 5 in x 5.5 in
- Take the plastic container and use only the top or bottom part. now place that directly over the top right or left corner of the white cardstock and draw a circle around it using a pencil.
- Now cut the circle using a crafting knife or cutter.
- If you do not have a plastic container, you can use acetate sheet. Draw a circle of 3 cm diameter on the top right or left corner of the white cardstock and cut it out. Now cut a small 4 cm x 4 cm square of acetate sheet and stick it on the under side of the circle cut out.
- Now cut thin ring from the other cardstock ( I used blue cardstock) which has diameter 3.3 cm and thickness 0.25 cm.

- Now stick the ring above the cut circle neatly using Fevicol or any other adhesive.
- Also cut a stick like piece which looks like a rattle stick .
- Stick the top part of the rattle stick near the ring.
- Now tie a satin ribbon bow around the stick. Once the bow is secured to the stick, stick the rest of the stick to the cardstock using strong adhesive.
- Now ready your card base scored and cut. I have used blue cardstock which is 11 in x 5.5 in. I scored it in the middle to get a 5.5 in x 5.5 in card.
- Now place the white cardstock on the card base and trace the circle on the blue card. This is the part which will be enclosed.
- Turn the white cardstock upside down and using mounting tape closely put tape around the circle cut out so that no gaps are there else sequins will seep out. Put mounting tape evenly across the remaining part of the cardstock. If u do not have mounting tape then use foam tape or craft foam.
- If you are using plastic container, pass it through the circulate part and place it upside down. Now fill it up with different kinds of sequins. I used Blues, Greens ,Yellows and Whites. I added few stroller like sequins in the mix.
- If you are using acetate sheet, then double up or stack up your mounting tape. a small well will be formed in the center. Fill it up with your sequin mix.
- Now apply Fevibond or any other rubber based adhesive on the open part of the container and remove the papers off the mounting tapes. Place the blue card on top of the white card carefully. Once Placement is correct, press evenly over the card.
- Your Shaker card is ready.

- I have used plastic container to obtain rattle like noise when the card shakes. Using acetate sheet gives you a shaker card with less noise.
- Now cut a blue banner and a little white piece of card stock.
- Stamp your sentiment on it using coordinating color. I stamped congrats using a Memento dye ink in Bahama Blue color. The stamp set I used is Grand Handwritten Sentiments range from Just Rite.
- Use mounting tape to stick the sentiment to the card. Mounting tape adds dimension to the sentiment.
- Now for the inside, I made an envelope using white cardstock. Made the Flap using blue cardstock.


- I took 4.5 in x 4 in piece of white cardstock. Scored at 0.25 in from 3 sides from border. Folded it and stuck it to the card. I added flap which was 4 in x 1 in. I scored it at 2 in x 0.5 in and folded it. Stuck the half part inside the envelope and left the rest out.
- I stamped mustaches in same Bahama blue ink on the white envelope.
- That's it, write your message on the right side of the card and fill you envelope with cash and seal the flap using strong adhesive and your money card envelope is ready.


plz if u can share a video of this.. card..
ReplyDeleteHey Rashida..I do not have a video tutorial for this card..however I will do one for this card as soon as possible...its a little busy for me right now. But I will do one very soon and I will upload it. Ty for visiting me....
Delete